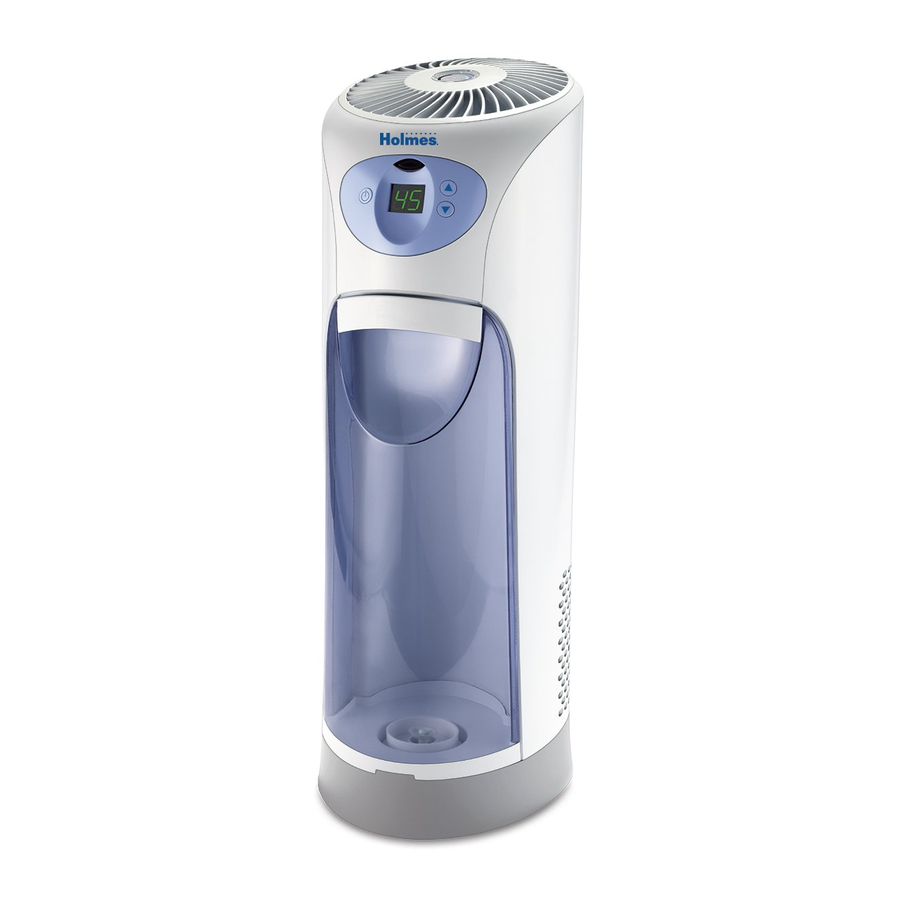

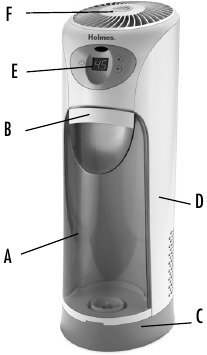
Your Holmes ® Cool Mist humidifier draws dry air through the rear air intake grill area. This air is then passed through a moisture–laden wick filter, which retains the minerals and deposits in the water. The resulting moist air is directed back into the room from the top air grill.
NOTE: This humidification system provides a cool, invisible moisture output. It is normal not to see the mist.
NOTE: A humidity level below 20% can be unhealthy and uncomfortable. The recommended humidity level is between 40%-50%.
Your humidifier is equipped with a technologically advanced AccuSet Plus TM Digital Humidistat. You can set the humidifier to run continuously in manual mode or set the AccuSet Plus TM Digital Humidistat to your desired humidity setting. The AccuSet Plus TM Digital Humidistat will automatically turn the humidifier ON or OFF, depending on the preset comfort level. The comfort level ranges between 30% and 65% relative humidity.
Manual Mode Instructions:
NOTE: The display range is 21% - 90%. If your room humidity level falls below 21%, the unit will display 21. If your room humidity level rises above 90%, the unit will display 90.

To take advantage of the AccuSet Plus Digital Humidistat, press the button until the speed is set in either the AUTO HIGH (A3), AUTO MEDIUM (A2) or AUTO LOW (A1) setting. Then adjust the set humidity by using the up and down buttons. Humidity will increase or decrease in increments of 5%. When the humidity level is set, the display will return to show the current room humidity. When the room humidity level rises above the set humidity, the humidifier will stop. When the humidity level drops below the set humidity, the humidifier will turn on automatically.
NOTE: Allow up to 30 minutes for the filter to fully absorb water and for the unit to produce moisture.
NOTE: The AccuSet Plus Humidifier has memory. This means that when you turn the unit back on, it will be at the last setting the humidifier was set at.
If you do not plan to use the humidifier for two or more days, make sure any residual water is drained from the water tank, base and wick filter to prevent algae or bacteria growth.
The Auto On/Off timer will allow the user two options, to set a time to turn the unit off or to set a time to turn the unit on.
While the unit is running, the off timer can be activated by holding down the up and down buttons simultaneously for 2 seconds, the screen will flash 00 and the up and down arrows can be pushed to adjust the timer up to 16 hours in increments of one, once 16 hours is reached, the next push of the timer button will cycle back to 00 hours. When the timer is activated a LED will indicate that the timer is on. The unit will then shut off after the timer expires (in its current setting). While the unit is running, the timer will shut off if other modes are being changed. The timer should only be deactivated if the unit is turned off.
While the unit is off, the up and down buttons are pressed simultaneously for 2 seconds and the display will flash 00 the up button may then be pushed again to increase the hours to turn on (in its last setting) from 1-16 in increments of 1 hour. The unit will then come on after the timer expires, if the unit is then turned on, the timer will be deactivated. There will be a LED to indicate the timer is activated. Once 16 hours is reached, the next push of the timer button will cycle back to 00 hours.
NOTE: The Auto On Timer will only activate when the room humidity is below 30%.
Through normal use, waterborne minerals and sediment become trapped in the wick filter. The harder your water, the greater the amount of minerals in the water, and the more often you will need to change your filter.
You will be able to monitor the life of the filter in your humidifier by checking the FilterCheck ® Indicator.
NOTE: After 30 minutes of use, FilterCheck ® Indicator will move and indicate your filter condition.
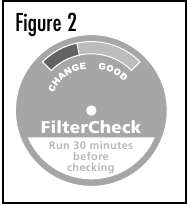
A brand new filter will register in the section reading GOOD filter. After frequent use of your humidifier, the FilterCheck ® Indicator will let you know when the filters need to be changed, see Figure 2.
When the needle is in the CHANGE section, this means the Figure 2 proper amount of moisture is not getting into your air due to the excessive minerals and sediment that have become trapped on your filters. At this point, you should replace your filter. It is important to change your filter as indicated to obtain stated performance level.
To replace the filter, follow the steps below:
It will take about 30 minutes for the humidifier to reach maximum output.
You can purchase replacement filters (model HWF100-UC2/HWF100 – 2 filters) at your local retailer, by calling 1-800-546-5637, or by visiting www.holmesproducts.com. It is recommended that a replacement filter is purchased for uninterrupted use.
Humidifiers provide comfort by adding moisture to dry, heated indoor air. To benefit most from the humidifier and avoid product misuse, follow all instructions carefully. Please note that this is an electrical appliance and requires attention when in use.
In addition, if you do not follow the recommended care and maintenance guidelines, micro-organisms may be able to grow in the water within the water tank. You must routinely follow the cleaning procedures that follow in order to ensure proper, efficient operation of your humidifier. Proper maintenance and cleaning is essential to the continued performance of your unit and the avoidance of algae or bacteria build-up.